
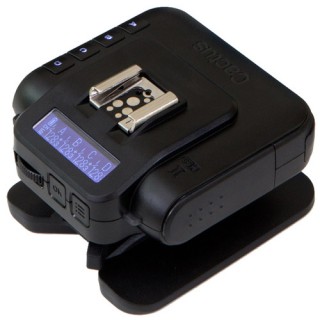
With my recently broken flash transceivers (read about that here) being just a few months out of its 1-year warrantee I decided to open it up and attempt to fix it myself. During the process I found some interesting things I though I’d share.
I have two other Cactus V6 transceivers that work great. The V6II has always had some issues since it was brand new. The foot easily rotates or wiggles in the hot shoe, the firmware was buggy, it did not support TTL and HSS on Fuji for the longest time even though they claimed it worked. Thankfully a few software updates from both Cactus and Fuji fixed the HSS and TTL issues. The hot shoe issue was still a huge problem. Randomly the pins would misalign and the V6II would not fire at all so I kept around and extra V6 incase it stopped working all together.
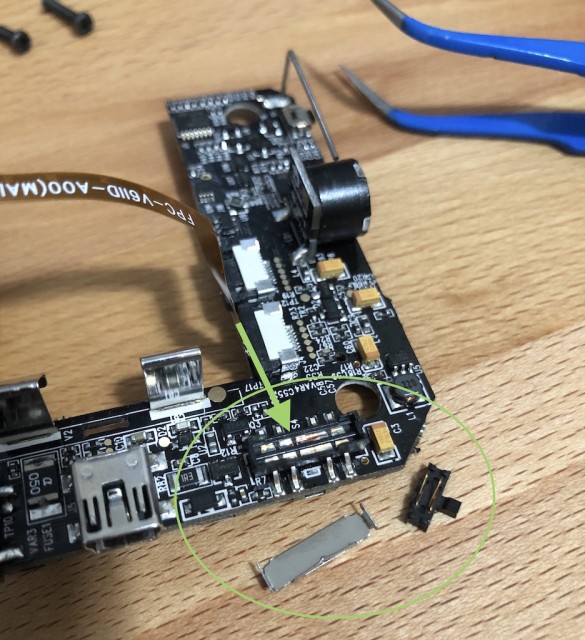
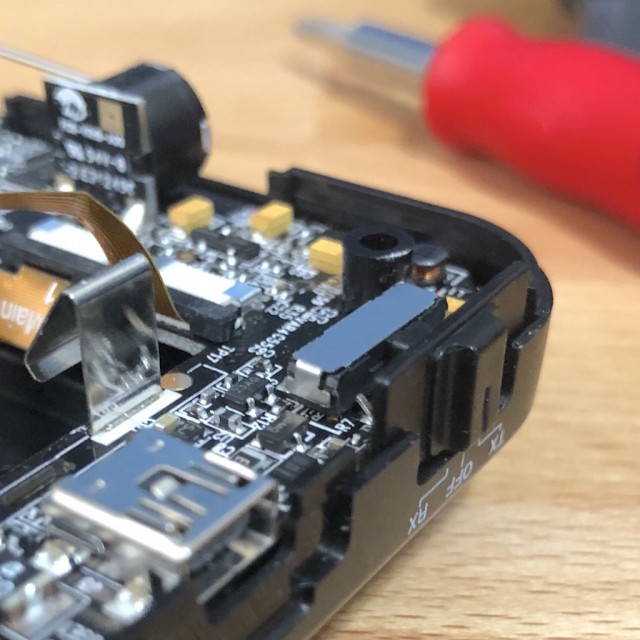
When the switch on my V6II broke I decided to see if I could also fix the hot shoe wiggling issue. It was fairly simple to take apart the unit. 4 screws hold it together with a few ribbon cables connecting everything. If you have ever replaced an iPhone screen or similar you will find this fairly easy. The bottom half of the unit contains the hot shoe connector. This is secured with three screws. I found that by tightening these screws the shoe stopped wiggling. The downside of course is that over tightening of the screws causes them to protrude from the hotshoe foot and it will not insert into the camera.
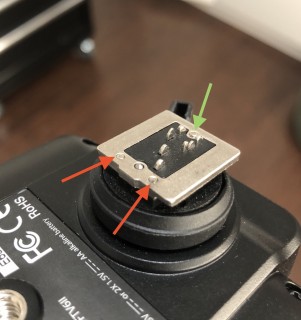
I tightened the two screws in the front of the unit until they were flush with the foot (red), about 1/4 turn. I then tightened the rear screw (green) until snug since it never fully enters the hotshoe on my Fuji. This has removed all play and wiggle from the V6II. It looks like Cactus simply used screws that were slightly too long and could not tighten them enough without them protruding.
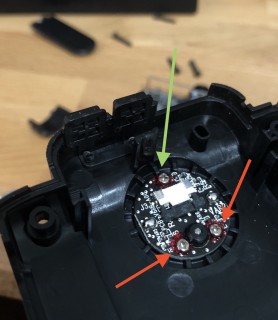
Next up was the on/off switch. It has 3 positions, Tx, off, Rx. I located all the parts that were rattling around inside and was surprised to see how Cactus had constructed it.
Yes, that’s right, it’s not a sealed, self-contained switch but rather a plastic box with a sliding plastic/metal contact and a metal cover plate holding the whole thing together!

It was fairly strait forward to put together. you can see how the metal tabs lock into the plastic sides. It is also clear that the slightest bit of upward force put onto the switch could release the metal cover plate, as it did for me, rendering the entire unit broken. I did my best to bend the metal tabs so they would hold more securely but it seems likely it could pop off again.
Hopefully this will help someone else with a broken power switch on their Cactus V6II transceiver. While I love the functionality of the Cactus system I don’t know if I can count on it to work when I need it. I may be switching soon to the Flashpoint/Godox 2.4ghz line of flashes now that they are Fuji compatible.
For as long as I can remember my Dad, a 30-yr+ wedding-video-veteran, has told me “you always need a backup”. He had backup batteries, tape (S-VHS), lights, cables, etc. He would even take a second (massive JVC DV500 camera) with him on single camera shoots “just in case”. He was ready when a second shooter forgot something, and yes, that one time when a child knocked over his tripod breaking both his camera and lens at the mount he simply went out to the car, grabbed his backup camera, and kept shooting.
Now as a photographer I typically pack backup camera bodies, additional lenses, cables, batteries etc as the saying goes, “one is none and two is one.” So far I’ve only had occasional issues with batteries and thankfully no serious mishaps where I have needed my extra gear. Just a few weeks ago I had an experience that made me glad I had taken my Dad’s advice.
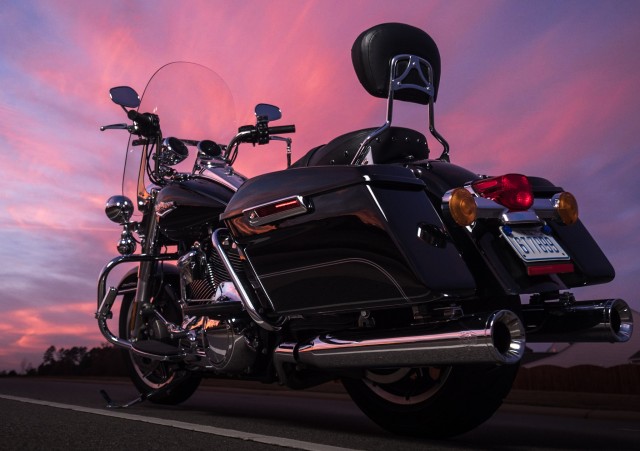
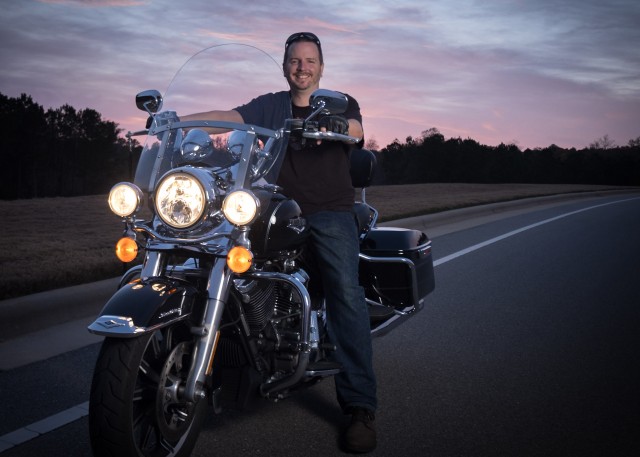
I had been talking with my neighbor about photographing his new Harley and one day he called me out of the blue and said it was washed, waxed, and ready to go if I could shoot it that night. With 1-hour until sunset I had to hurry if I we were going to make it that night. I quickly grabbed my gear, threw batteries on the chargers, and made sure I had my shot list and location set.
I arrived as the sun was just beginning to set. I got my gear setup, dialed in my settings, and took a few test shots. The wireless flash trigger for my flashes was not behaving so I flipped the switch off an on to try and fix the problem. This is when I heard a pop followed by a plastic rattle (never a good sign with electronics). The power switch had broke internally rendering the transmitter lifeless. Pausing for a moment I laughed to myself. The beautiful purple/pink sunset in front of me showed no signs of waiting. I thought of my Dad as I reached into my bag and grabbed my backup transmitter.
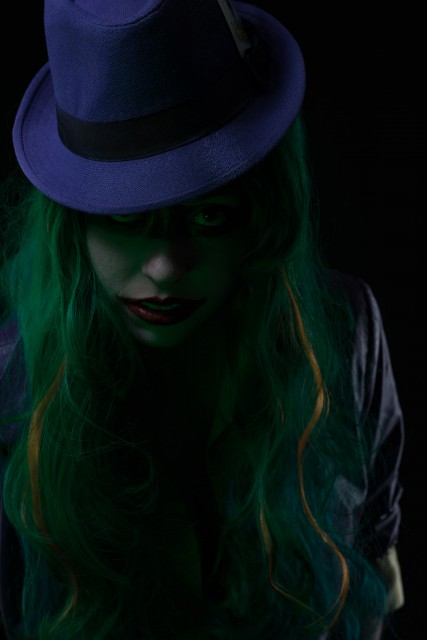
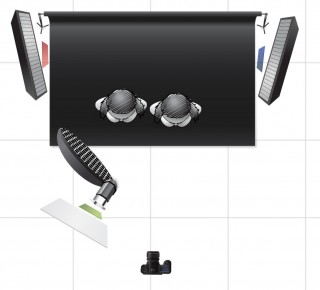
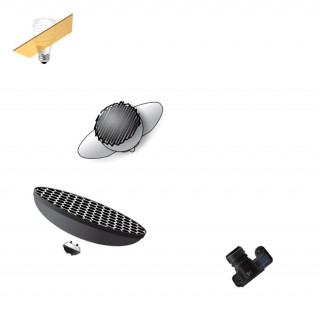
My friend and fellow photographer Josh Thompson had an idea for a cosplay shoot. His wife, Vanessa (aka Scarlet Spitfire), and their friend Darby would cosplay characters from Batman. Darby would play the infamous Joker and Vanessa would play Harley Quinn, the Joker’s therapist turned girlfriend. Since these characters are both villains I knew we would want to shoot on black and use very contrasty and moody lighting. I used a black paper backdrop so we could shoot full length shots if needed. Since their was two models and limited space I knew we need one lighting setup that would work for nearly all of our planned shots without the need to readjust. I started with two speed lights in strip boxes with grids about 3 feet from the black background. 3 feet in front of those were the models and 3 feet in front of the model was a gridded beauty dish at 45/45 above and left of camera.
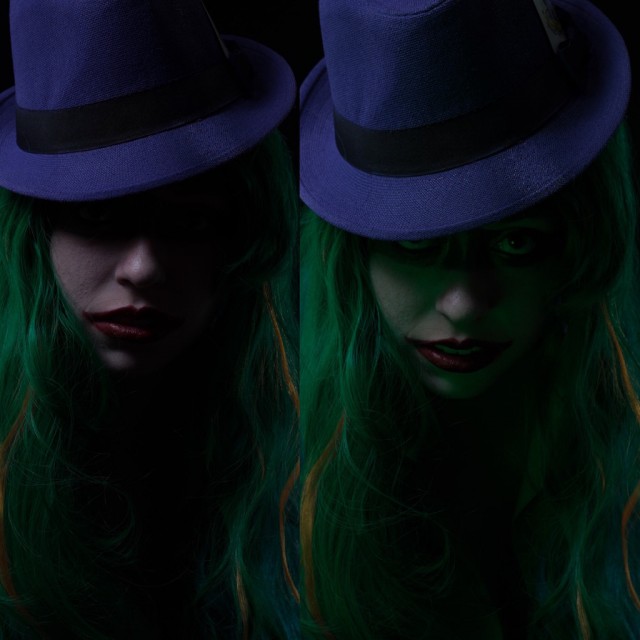
The initial shot I got out of the camera looked great. It was dark and contrasty and really set the mood we were going for. It needed a little pinch more evil to keep it from looking like a glamor shoot. The solution was to use a 4th speed light as a fill with a green gel. This green gel would be a few stops under the key light and help fill the shadows with green. Here are two similar frames, before and after the green fill was added.
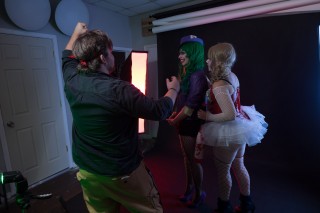
Josh and I took turns shooting both models which was great as we both shot a variety of different poses and ideas. I decided to change up the lighting about half way through. I removed the grids from the beauty dish and strip boxes. A red gel was put on the left strip and a blue on the right one. Here is Josh testing the lighting.
I felt that this really gave it a more comic book/movie lighting as the red/blue/green lights all converged to create a unique and unsettling look.
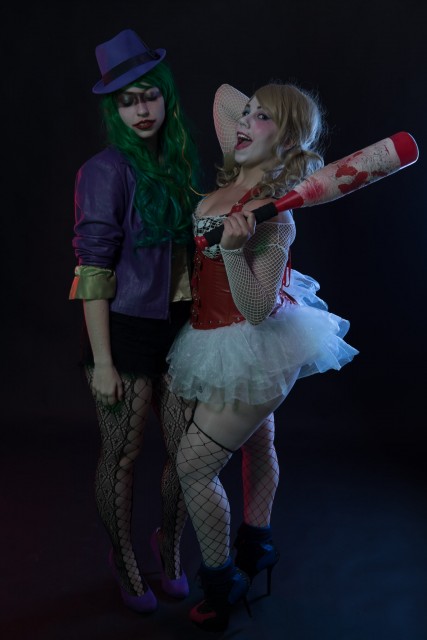
It’s always fun to work with models who know their hair, makeup, and wardrobe. Overall it was a super fun shoot, I mean how else can you get cool shots like this?
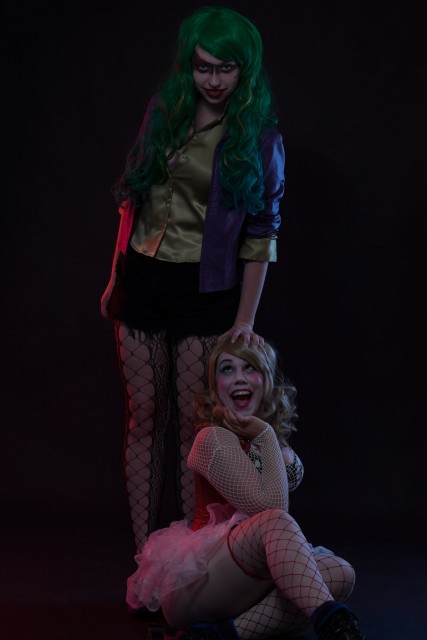
*Note – All images shown are unedited and strait out of the camera. Shot with the Fuji X-T1, 10-24, 35/f2, 56, and 90 lenses.
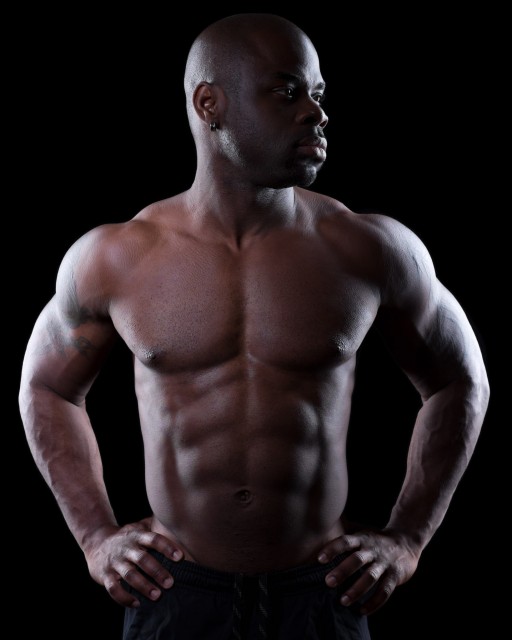
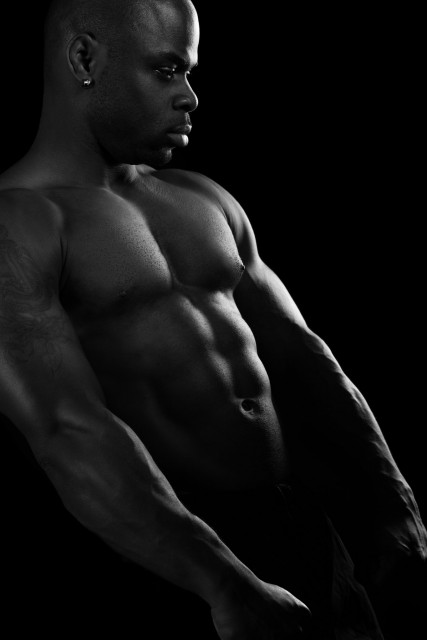
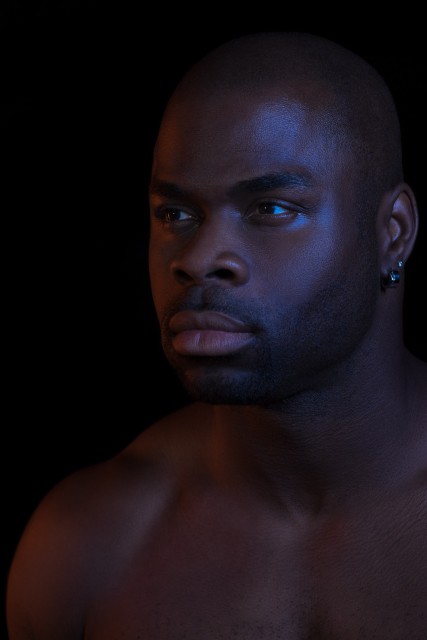
Linwood had been seriously working out for a few years now and he wanted some professional fitness shots taken. I decided to go into full studio mode for this shoot, environmental portraits of him in the gym etc would be great but require much more planning and setup than we had time for. With studio shooting I can control everything and really showcase his hard work.
I had shot similar style photos before but not full length. That would require some large strip soft boxes. I quickly ordered two and started testing them as soon as they arrived. I typically like to plan out every detail of my shoots ahead of time so I know exactly what I need to do and I can focus on the model and not the gear. I setup 4-5 different looks and took test shots with my wife and I was thrilled with the initial results.
Originally I planned to shoot for about 2 hours with Linwood. After multiple wardrobe changes and looks we ended up shooting for almost 5 hours, definitely one of my longer shoots but the results were worth it. Because of Linwood’s physique I was able to hit him with some really hard light to shape and contour his body. I don’t get to use this style of lighting often as soft light tends to flatter most people better than hard light.
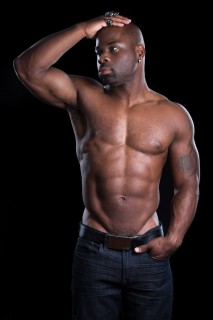
At the end I was able to sneak in a few unplanned and more artistic shots. This was my first fitness style shoot and it was a lot of fun. Linwood was a natural at posing and now I’m going to have to think of some future projects to use him in.
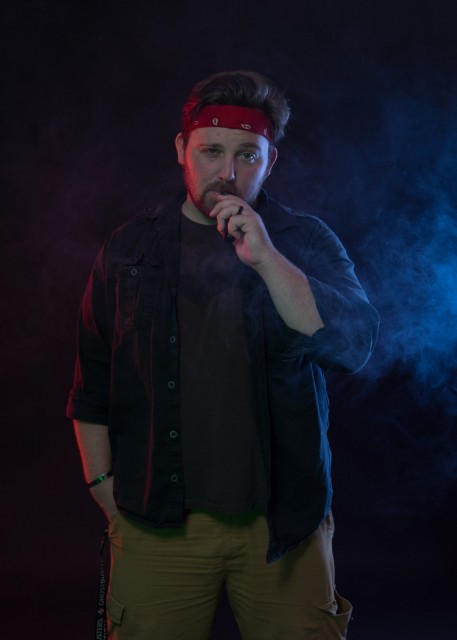
I’ll be posting Behind the scenes photos, lighting diagrams, and notes from some of my past photo shoots so you can see what goes into the images I create. Some are very simple and others require weeks of planning. I’ll start with this photo of my friend and fellow photographer Todd of Todd Tkach Photography.

Todd came into town from Pittsburgh to attend a photo workshop with me. After the workshop we started playing around with off-camera flash and I showed him how I used speed lights to create my portraits. I connected my camera to my laptop and the laptop to the living room TV so while we shot Todd could see the images in real time. I try to shoot “tethered” to my laptop whenever possible to allow clients to see the results in real time and to catch small errors like hand position or make sure focus is perfect.
Since we were just playing around I asked Todd to step in front of the camera and soon noticed this was a great opportunity to take a spontaneous portrait. We were playing around with color temperature and balancing the flashes with the ambient light. Being from Pittsburg, Todd is a fan of Black and Yellow so I decided to shift the color balance of the ambient to a warm yellow which would contrast with the shadows on his face.
For the final shot, Todd’s head was directly in front of a lamp which produced a strong halo of light around him. I used a gridded beauty dish very close to Todd’s forehead to give him a strong edges to his face and highlight texture. I’m very happy with the final result considering the entire shoot took about 10 minutes.

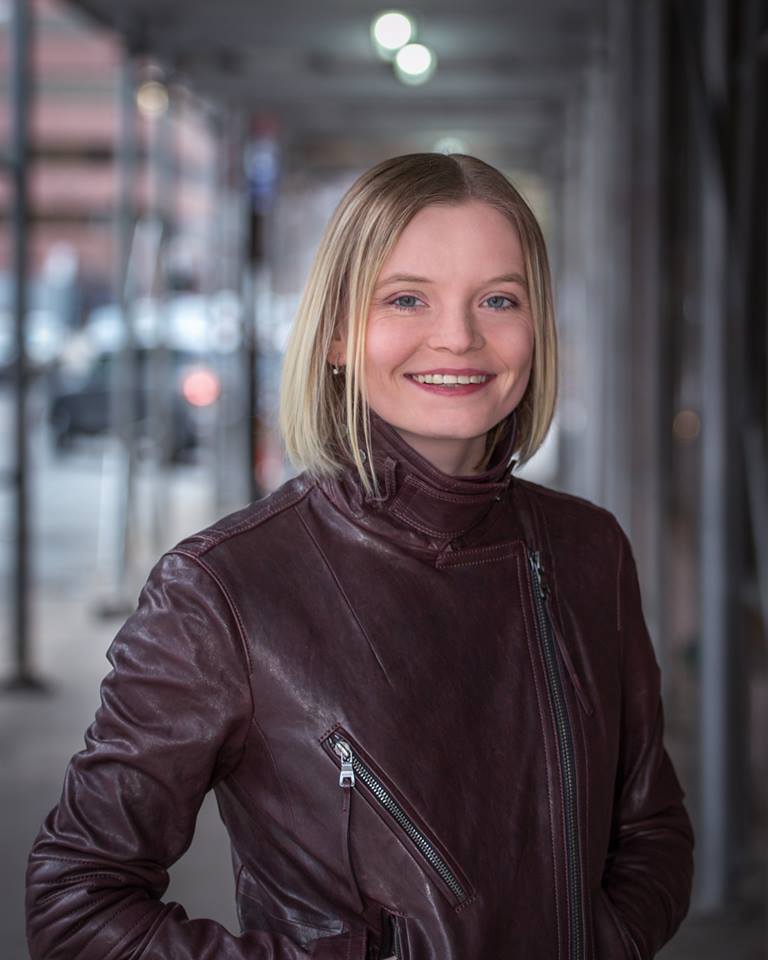
I finished editing the portraits of my wife and of the client (Vince) from my NYC trip. I posted this photo of my wife before with her “Blue Steel” look going on. I was trying to get her to smile, just a little bit but it was still cold in NYC and she was not having any of it. That is, until a fire truck full of fireman pull up behind me and started waving at her and complementing her. As soon as that happened she smiled for about 1.5 frames. Thanks guys!
I added some color correction and color toning to both of Vince’s portraits. I tried to create two different looks for him. He did have final pick over which facial expressions he liked best. I had to composite the portrait at his desk with 2-3 images total. The reflections off the desk combined with background lighting and other distractions didn’t work well in every picture. Thankfully the camera was on a tripod and Vince staid in basically the same spot. This was shot in a small conference room so I placed him almost in the door way to the reception hall and shoot from the opposite end of the conference table.


When I shot the photo of him standing, I flipped around and setup in the hallway and shot into the conference room so I could have a traditional background of law books. At one point I was almost sitting in the receptionists desk and considered asking her to shoot for me! Thankfully these were all shot tethered and I could check everything on a larger screen in real time.


I’m happy with the results of both sets of photos. I forgot to take Behind the Scenes photos of this shoot which I normally do. I will be posting break downs and lighting diagrams from other shoots so that you can see some of the thought process and intention behind many of my photos.
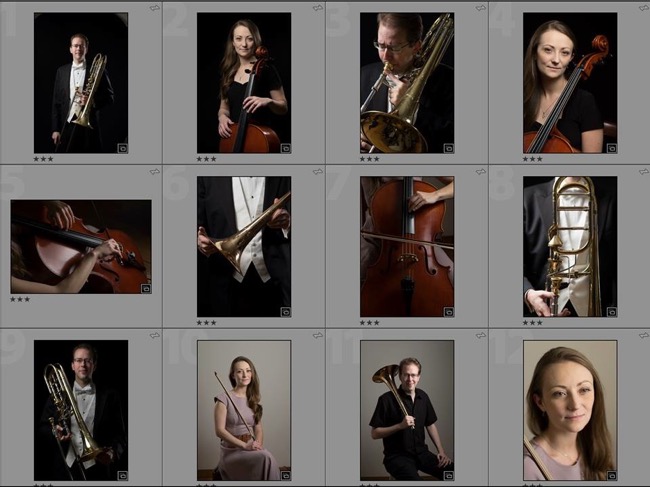
My wife and I drove down to Atlanta this weekend to photograph two of our musician friends who are getting married in October. This is my first time shooting musicians. Instruments can provide their own challenges with shiny and reflective surfaces. I had a few concepts for how I wanted to light and shoot some of the images and I had a basic shot list to run through.
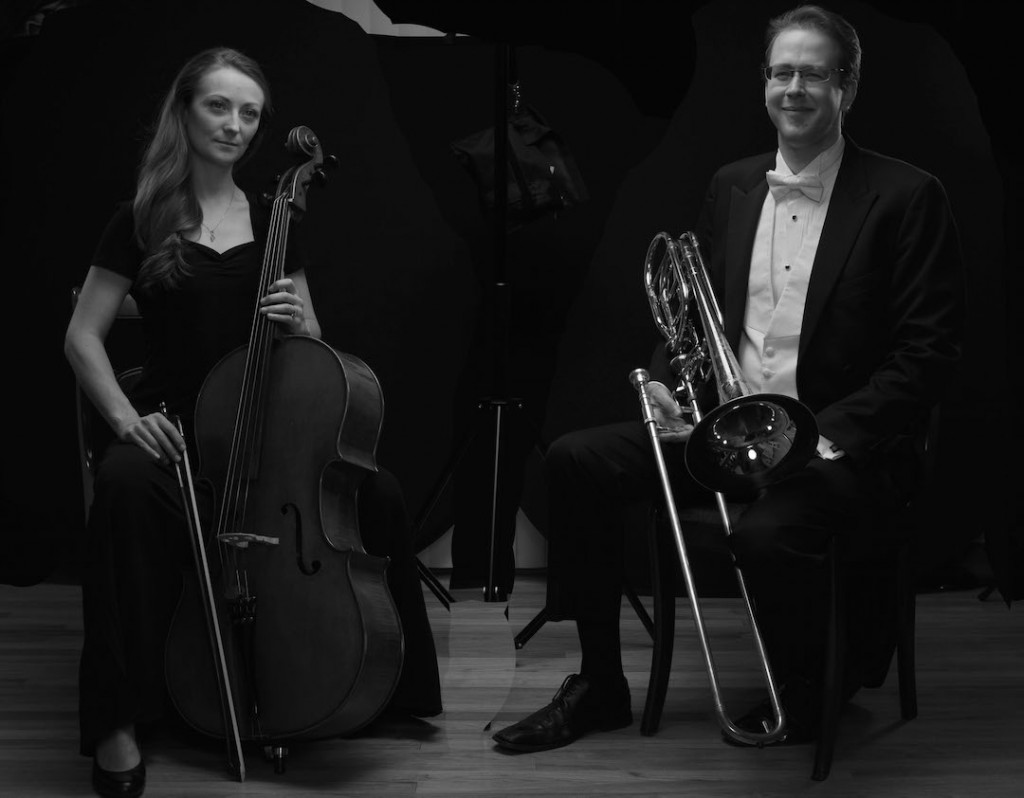
The main concept was to have a portrait of both of them together holding their respective instruments as if their were performing a duet and in-between sets. I went with a wider 27mm lens on my Fuji X-T1 so I could fit both of them into the fray from head to toe. I then lit everything from overhead with a large 60” umbrella to give the scene a stage lighting feel. I decided to shoot each of them individually so that I could focus on the minute details of each of them. The final image will consist of around 5 images stitched together.
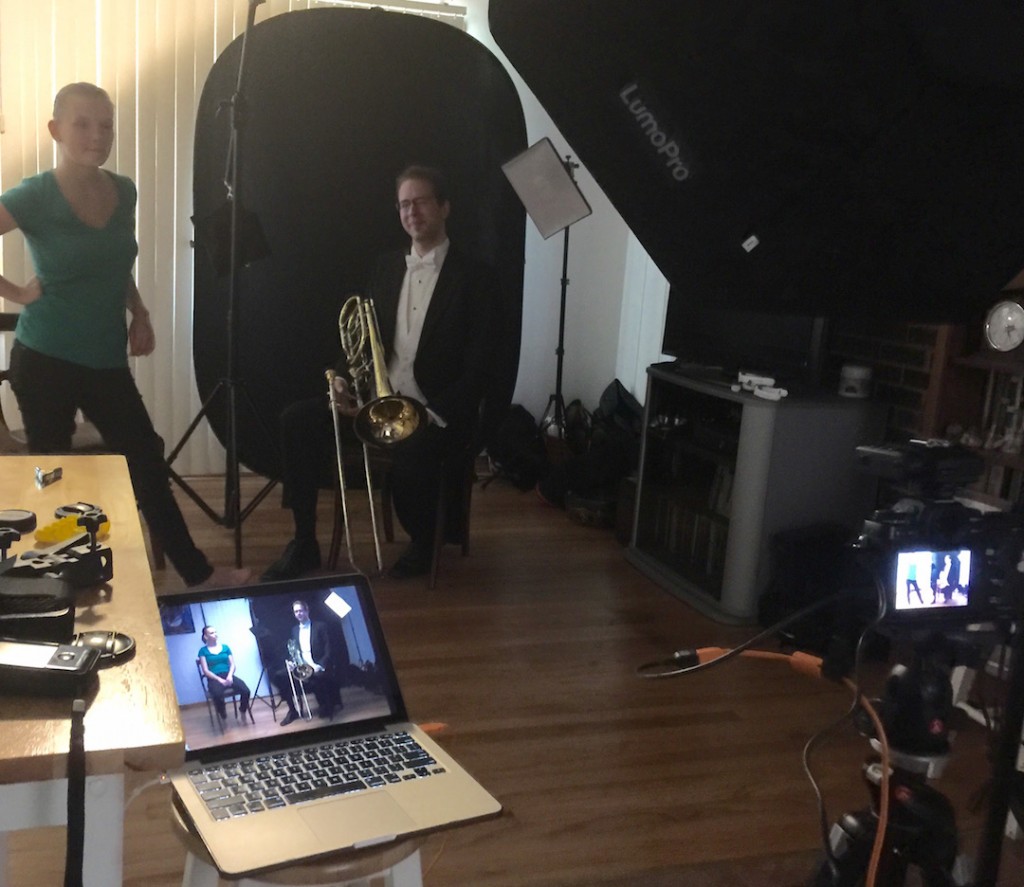
I used a variety of new equipment on this shoot. This is the first serious shoot I did with both the X-T1 and the new Cactus v60 flashes. Throughout the 6 hours of shooting I shot 14 different poses and lighting setups total, used 4 different Fuji lenses (27, 35, 56, 90), and shot over 550 pictures tethered to Lightroom with the new Fuji plugin. I also used a Sekonic light meter and a Datacolor passport color chart for calibration.

The most impressive parts for me was that during shooting continuously for 6 hours I never had a single flash fail to fire, I only went through a single set of AA batteries for each of the flashes and the Fuji X-T1 had maybe 3 out of focus shots out of 550. I was impressed with the focus, sharpness, and detail I was able to resolve in the images. I’m very happy with how the photos turned out so far as they still have to be edited. All of the above images are strait out of the camera with zero adjustments. I feel like the Fuji X-T1 was working with me and not fighting me like my canon would have.
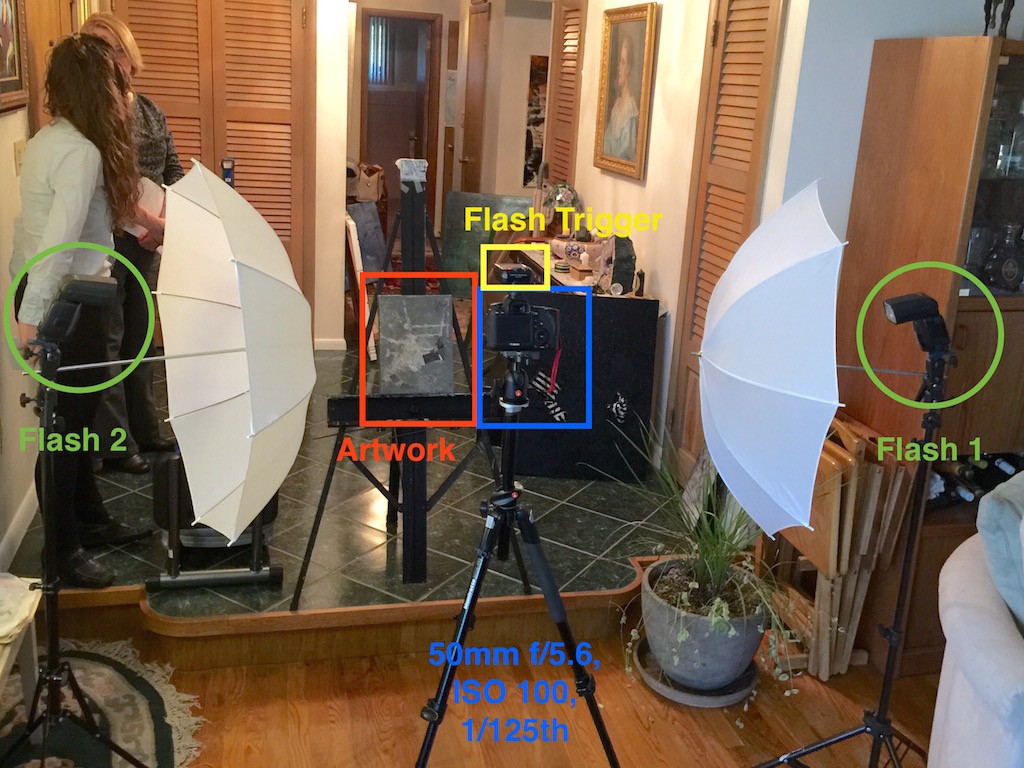
New page is up in the projects section. I detail how to photograph paintings to create a color accurate digital image with a minimal amount of gear. Check it out here!
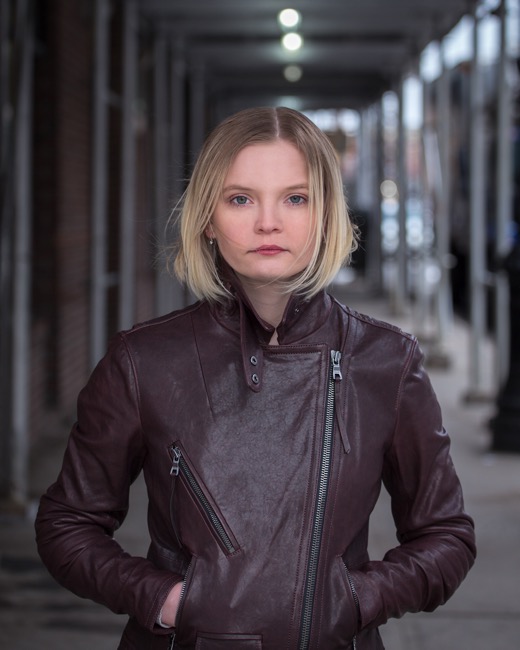
Went to NYC for the weekend to see a show, pick up a new jacket for my wife, and photograph a friend in his office. I convinced my wife to model her new coat for me while we were there.
My wife and I ran around my friends law office trying to find an interesting point of view to shoot him from. I ended up with the camera practically inside the receptionists desk so I could shoot into the adjacent library/confance room. I really like the 3D depth that was created. A key and a fill lit him from either side with a bare speed light bouncing into a reflected to illuminate the background.
We had just enough time for one more setup. I quickly swapped sides and shot from the opposite side of the room (next to the painting above). I wanted to get a nice reflection in the glossy table but it was a huge pain to light the lobby seen in the background. Both images still need to be edited but I’m happy with what we got considering the constraints.
I’m sure you will see one of these up in the photography section when it’s complete.
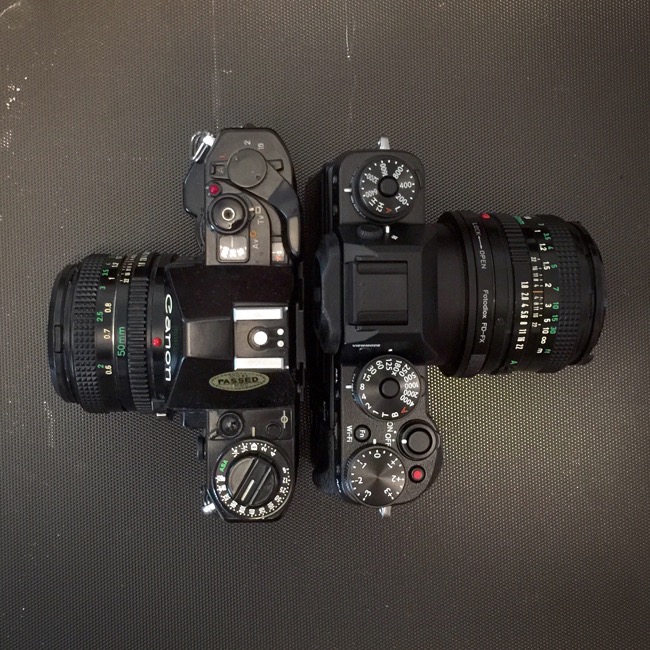
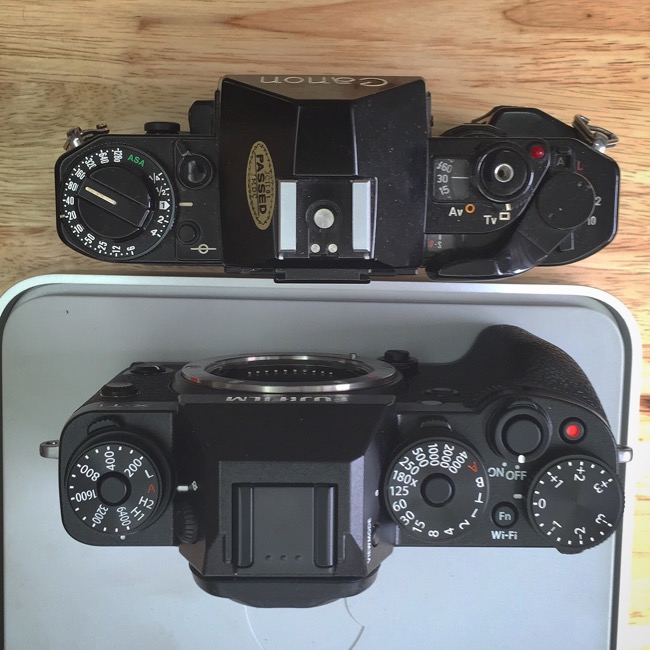
Testing out the Fujifilm X-T1 mirror less camera. I wasn’t sure why I liked the design so much until I pulled out my 30-year-old Canon A-1 film camera. The controls are nearly identical in both function and position. I can even use a simple adapter to use existing FD mount manual lenses. Pretty neat.
Recent Posts Widget


Copyright Brett Martin 2015