
I have been photographing paintings from a young local artist for the past few years. While flat artwork like paintings can be professionally scanned the process involves packaging and shipping the art, and is typically expensive. A quicker and easier workaround to digitizing paintings is to photograph them with a high quality camera and calibrated lighting.
My total gear consists of a Canon 6D dslr, 50mm f/1.4 lens, 2x Canon flashes, canon flash trigger, 2x small light stands, 2x shoot through umbrellas, and a gray card. I can setup and take my test shots in about 30 minutes and in another 30 minutes I’ve typically shot 10-20 paintings.
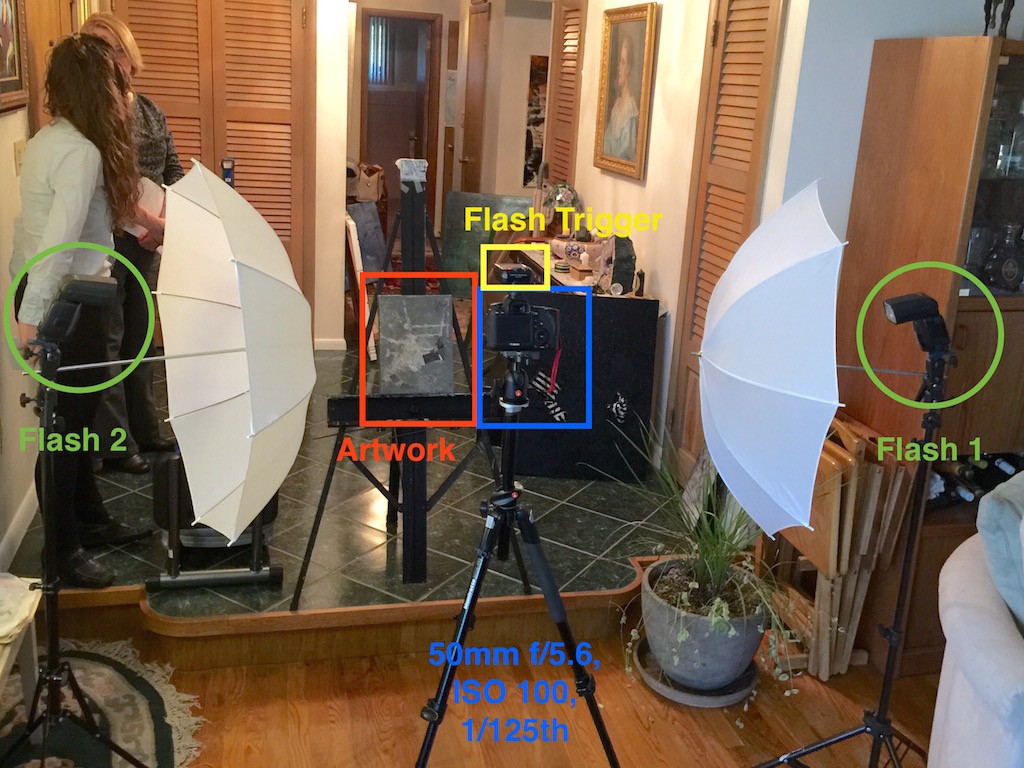
The paintings all go on an easel and I setup my camera on a tripod to match the height and angle of the paintings. I use a 50mm lens due to its low distortion and few optical elements. I setup two small speedlight flashes on small lightstands with shoot through umbrellas, one on each side. The umbrellas are facing each other and almost 90deg from the painting allowing the light to feather onto the painting reducing hot spots and reflections.

I typically shoot at ISO 100 to minimize noise. I use a f/5.6-f/8 aperture to make sure everything is in focus as many of the paints have a 3D texture that can get lost when shooting so close (3-4 feet away) with a larger aperture. I then adjust my shutter speed to knock out any ambiant light, usually around 1/60th-1/125th. The flash power is manually adjusted until I have a solid exposure on my histogram as I want the flash to be the only light source.
After a few test shots to make sure everything is setup I shoot 3 images of each painting. The first is a shot with a 18% gray card in front of the painting. This lets me calibrate the colors of the image in Lightroom later quickly and know that I have accurately represented the work. I then take two images of the paintings using autofocus. I defocus the lens between shots to make sure I have a super sharp image as sometimes one photo will be blurry. I also use the 2 second self timer or a remote to trigger the camera. This helps keep things sharp.
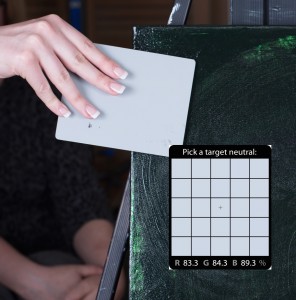
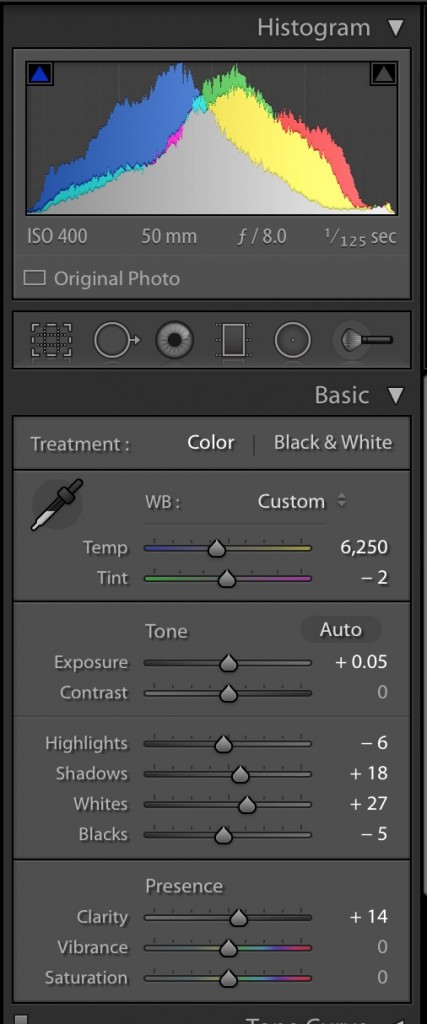
Post processing is fairly simple. I drop all of the photos into Lightroom. I sort out all the photos so I have 1 gray card shot and two shots of each painting. I then use the eyedropper tool to select the gray card and set the white balance for each of the gray card shots. After that I select the adjacent two images and press the Sync button to copy over the white balance settings. I run through the images and select the ones I feel are most sharp. From there I crop and and fix any framing issues so the painting fills the frame in a tight crop.
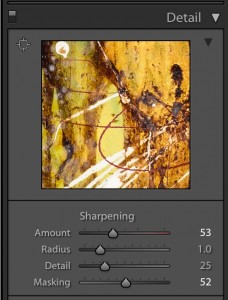
After the final photos are cropped I apply basic exposure adjustments to all of them to pull out as much dynamic range as possible while maintaining the original look of the painting when I viewed it in person. First I bring up the whites and pull down the blacks until they both start clipping. I then bring up the shadows and will pull down the highlights, sometimes all the way, to reduce highlights. I may add a touch of clarity depending on the style of painting. Lastly I add sharpening and adjust the sharpening mask so that it enhances the paintings lines and edges subtly.
Files are exported as large TIFF images and small 1024 JPGs so that they can be printed or uploaded to the web.


